We stopped by Gowanus Audio in Brooklyn, NY to get a step-by-step rundown of their DIY Bluetooth speaker class. Founder, Pete Raho, generously shared details and tips in the video below so you can make it yourself!

Watch the Video For Explanation on All the Things:

3 Options for How You Can Build This:
- Go to the in-person class. There you’ll have access to all the tools and components you need, guided instruction that’s great even for beginner-level DIY-ers (that may not describe SolidSmack readers, but perhaps someone you know), and maybe even some beers! The first class will be steeply discounted by $100, and will be held over 2 evenings – April 5th and April 12th. Plus, there’s an additional discount if you register for 2 people at a time. You can sign up for classes HERE.
- Built it at home with the mail-order kit. If you’re not in New York City, you can still play the game at home by ordering the kit. There are 2 versions of the kit available — both contain all the components you need plus written and video instruction, and email support. One also includes tools and glues needed to do the job if you don’t already have those laying around {see option “Complete Kit (with tools)“}. If you already have the tools needed, you can select the “Complete Kit” option. And just for you SolidSmack readers, because you’re the best: use code solidsmack20 for 20% off any kit! Hurry, offer expires April 3rd, 2019.
- Source the components yourself and hack this publicly available design. Pete Raho was kind enough to share the original boombox design the mono Bluetooth speaker class was built off of. Raho made a lot of modifications and tweaks to make assembly as simple as possible in option 1. and 2. He also designed and CNC’d the wooden enclosure which you would have to create from scratch, or you can purchase just those pieces from Gowanus Audio HERE (see “Enclosure Only” option). Same as with the other 2 kit options, using code solidsmack20 will get you 20% off until April 3rd, 2019. This route is great if you’re interested in a longer project with more customization.
Components Needed

Raho shared with us the most important specific parts he uses in this speaker kit. Not included in this list but needed to build are things like: wood glue, solder, tape, super glue, zip tie, adhesive foam strips for sealing housing and tools (soldering iron, screwdriver, clamps, etc.).
| 2.1mm Metal Panel Mount DC Jack |
| Jantzen Audio 0.90mH 20 AWG Air Core Inductor Crossover Coil |
| Dayton Audio DNR-20 20 Ohm 10W Precision Audio Grade Resistor |
| Dayton Audio ND90-8 3-1/2″ Aluminum Cone Full-Range Neo Driver 8 Ohm |
| Dayton Audio BPA-38SN HD Binding Post Pair Satin Nickel |
| Speaker Cabinet Port Tube 1-3/8″ ID Adjustable |
| Dayton Audio KAB-FC Function Cables Package for Bluetooth Amplifier Boards |
| NTE 54-645 SPST Round Hole Square Bezel Illuminated Rocker Switch with Red LED |
| 15 VDC 4A AC Adapter Power Supply with 2.1 x 5.5mm Plug Center Positive (+) |
| Dayton Audio KAB-60M 1x60W Class D Audio Amplifier Board with Bluetooth 4.0 |
| NTE European Terminal Strip 25-E2000 12-Pole 20A |
| Consolidated 22 AWG Red Solid Hook-Up Wire 100 ft. |
| Consolidated 22 AWG Black Solid Hook-Up Wire 100 ft. |
| Acousta-Stuf Polyfill Speaker Cabinet Damping Material |
DIY Steps
1. Glue and Assemble the Wooden Housing

If you come to the class or buy the kit, pre-cut wood pieces of the housing will be ready for you. They already fit together, so it’s just a matter of gluing. Smear glue in the grooves, stick the puzzle together and then clamp each corner applying pressure evenly. Pete uses 2 sets of strap clamps and gets the strap lengths ready to go before beginning gluing.

Do this step first, so the glue can set and dry while you’re working on the guts of your speaker. You should let it sit clamped up for at least 1 hour.

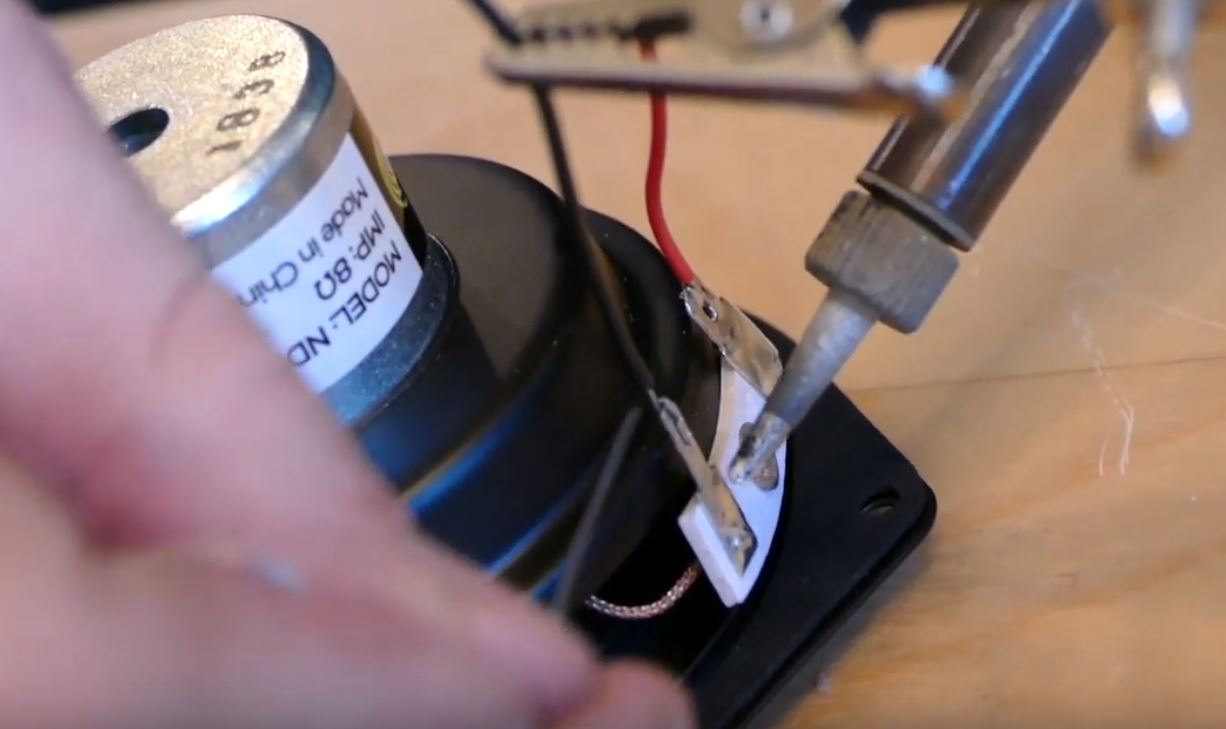
2. Solder Components
There’s a bit of soldering needed, but don’t worry if you’re not an expert: the connections are nice and fat. This project actually makes for a perfect exercise to learn soldering. And if you’re taking the class, Raho can walk you through soldering basics.
Otherwise, if you’re building this at home, and soldering is not your jam, check out that part of the video! Raho went super-detailed in showing how he makes each connection.
Solder Connection Points:
- Wires to positive and negative terminals of Power Jack After soldering, thread the wires through the pre-cut hole in the housing and add a dab of glue to the jack to keep it in place. The red wire is part of the power cable.

- Power Jack to Power Switch First stick switch into hole in housing! Afterward, solder the negative wire directly from the jack and also the other negative wire from the power cable to the switch.

- LED Part of the Power Switch to ground of Power Jack The LED indicator is connected via the gold prong on the switch. Use a separate wire and connect the gold prong to that same negative terminal of the jack you already have a black wire running from.


3. Set Port (Tube) Length and Insert
Take your slidey-tube thing, or “port”, and adjust its length to 5.75″. That’s the magic size Pete already knows is right for this design. To fix it in place, set the length with a piece of tape and then use a little super glue around the rim where the two pieces meet. Next, stick it through the pre-cut hole in the housing’s side.

4. Make Mechanical Connections
Take the connector from the power cable which you soldered to the jack and switch, and snap that into place on the circuit board.

Then, slip the pot through the enclosure — this will be your volume control (below). Secure it in place with a washer and nut. Next, pop on the black knob, adjust the positioning and tighten the set screw. There’s no soldering needed for the volume control; just snap the connectors in place at both the potentiometer and the circuit board.

The inductor and resistor parts of the low-pass filter are also solderless connections (below). Zip-tie the inductor to the small cardboard slab, hot glue the wire connectors and resistor to the board, and then screw the board to the back face of the housing. For the wiring, connect the hot side from the circuit to the right connector show here, then screw the wire in place. On the other side, you’ll have a wire coming from the other connector leading to the driver.

5. Final Soldering Step: Connect Driver
The hot wire from the inductor-resistor chunk and the black wire from the circuit board both need to be soldered to the driver next. Red gets soldered to the fatter tab on the driver, and the black goes to the thinner tab.
5. Add Foam Tape, Stuffing and Sew It Up
For one of your last steps, get your cotton-like Acousta-stuf shoved in there, leaving a little breathing room around the driver and baffle. Next, apply foam tape around the rim of the enclosure where the back panel of the housing will make contact with the rest of the box.

Finally, pop the back panel on and screw it in place. Tah-dah! You just made your very own speaker.

6. Make Some Noise!
Plug it in, flip the switch, and connect up your phone or other Bluetooth-enabled device holding your audio files. Press play and listen to the sweet, sweet sounds of DIY accomplishment.
Audio Experiments
After we built the mono speaker, Raho did some demos of how the audio sounds with and without acoustic stuffing and the low-pass filter connected. The sound experiments were recorded in 3D audio with the Hooke Verse binaural audio recording headphones we previously covered on SolidSmack here. (Yeah, I drank my own Kool-aid and bought a pair.) You can jump to that part of the video here and listen with headphones in to experience the 3D audio effect:
Future Plans for Gowanus Audio
Advanced Classes to Build Higher-End Gear
Raho hopes this beginner-level mono Bluetooth speaker class will be a sort of gateway drug to encourage makers to get into creating more complicated, higher-end hardware. If you’re already a hardcore audio addict, and are interested in a more advanced class, get in touch with Gowanus Audio. They might just push up the start date of a higher level class if they hear of enough interest…

Bring Instruction to Schools
Raho hopes eventually sales from the speaker classes and kits will allow him to create a fund to bring this instruction to kids. It’s a great STEM / STEAM project that could give children some hands-on, physical-world creation experience they may otherwise be lacking. As mentioned, this project makes for a great learning-to-solder exercise. And I’m all for trading out screen time for soldering time! Please get in touch with Gowanus Audio if you have ideas or interest in this.
Audiophile Conference
Raho has plans for a conference bringing together DIY audio lovers in June 2019 in New York City. The working name (subject to change) is currently: “The Brooklyn DIY Audio Conference”. An exact date hasn’t been chosen yet, but you can be notified by joining the Gowanus Audio newsletter here.
Here’s a synopsis about what is planned:
Come learn about building your own audio gear, listen to some of the best examples made in and around Brooklyn, and hear what the experts think about the future of audio.See and hear the winners of the Speaker Design Contest.
This is an event for anyone interested in music, gear, and how things work. It’s a down-to-earth crowd. No attitude. The event will be focused around home audio, but anyone interested in music is welcome.
DIY Audio Meetup
As a separate thing from the audio conference, Raho is also putting together a lower-key meeting for audio nerds in Brooklyn. If popular, the plan is to meet monthly at Makeville Studio. The next meetup is scheduled for Wednesday, April 3rd, 2019 at 7pm. Find out more here.
Contacting Gowanus Audio

You can check out the website here: GowanusAudio.com
They’re also connected with GowanusFurniture.com where you can order really beautiful, custom-crafted cutting boards.
Instagram: @gowanusaudio
Facebook: www.facebook.com/gowanusaudio/
Email: hello@gowanusaudio.com